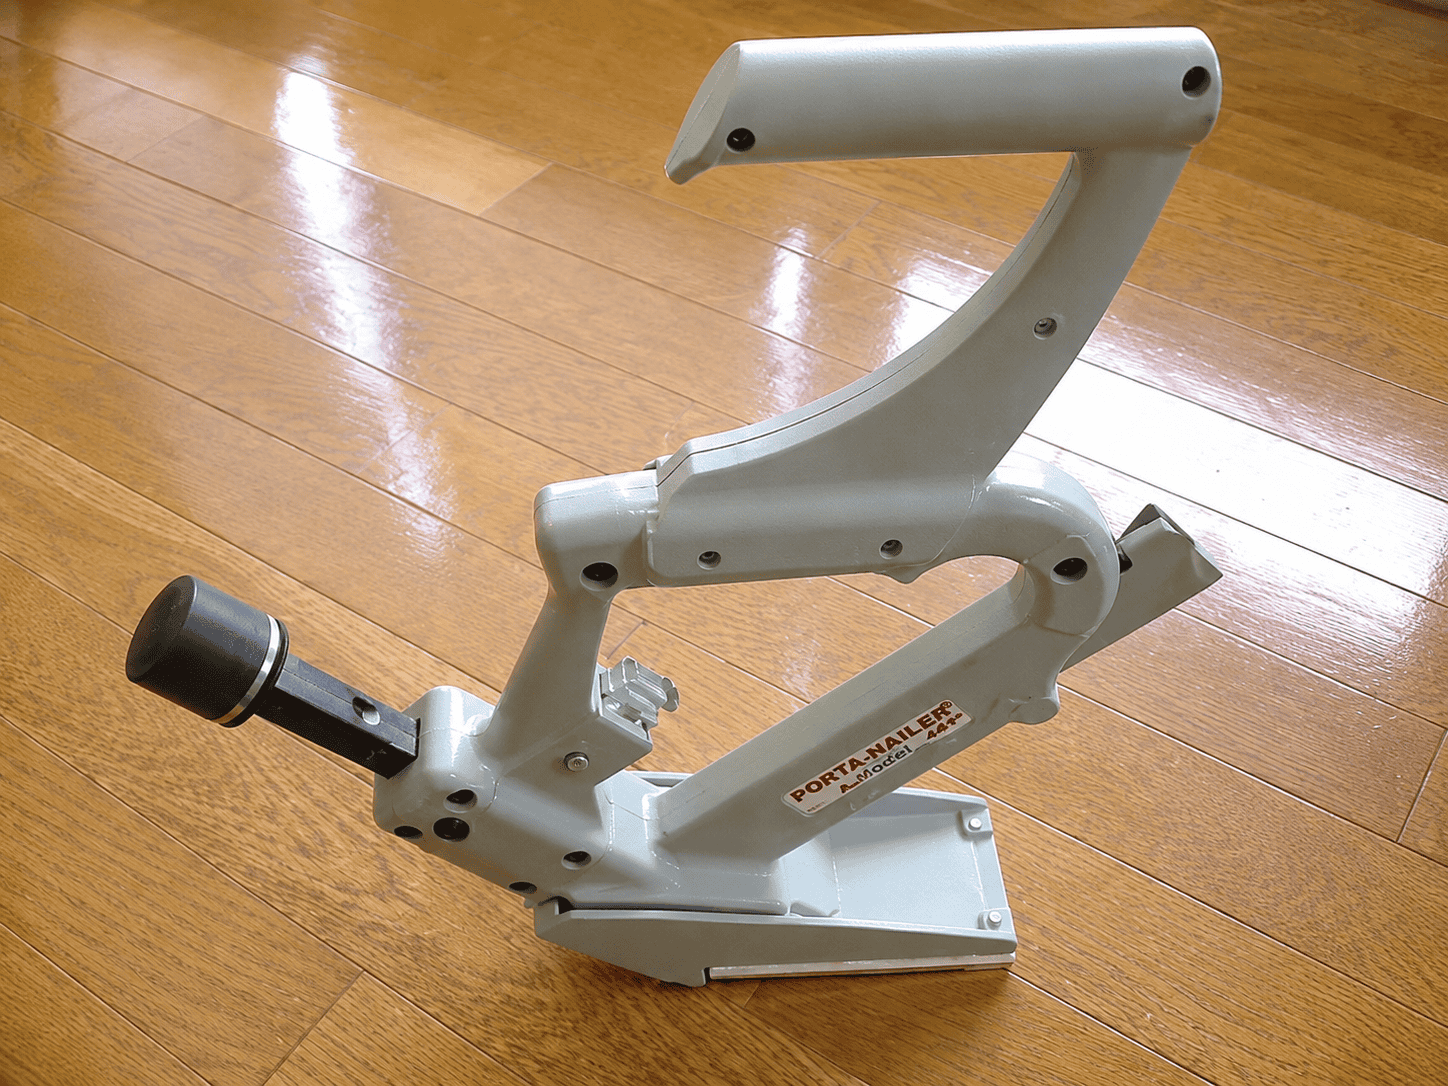
How to Install Tongue and Groove Solid Wood Flooring with a Manual PortaNailer
Tongue and groove solid wood flooring is a traditional flooring method that is making a well-deserved comeback.
Long before click flooring and modern floating floors became popular, skilled installers laid solid timber boards using concealed nails and a manual PortaNailer. The result was a strong, long-lasting floor with a beautifully clean appearance and no visible fixings across the main surface.
This old and fabulous installation method combines natural timber with simple, proven engineering. Each board is secretly nailed through its tongue before the next board covers the fixing. Once installed, you see the beauty of the wood—not rows of nails or screws.
If you are searching for how to install tongue and groove floors or where to get equipment to install tongue and groove flooring, A‑Z Hire has manual PortaNailers—also called secret nailers—available to rent in Dublin. Compatible T-shaped flooring nails are also available to purchase.
What Is Tongue and Groove Solid Wood Flooring?
Tongue and groove flooring is made from timber boards with two complementary edges:
- One side has a projecting tongue.
- The opposite side has a matching groove.
- The tongue of one board fits into the groove of the next.
- The interlocking boards create a level and tightly joined floor.
Traditional tongue and groove solid wood flooring is mechanically fixed to a suitable timber subfloor. It is not normally installed as a floating floor.
The individual boards remain visible, so the floor is not literally seamless. However, because the main fixings are completely concealed, the finished floor has a beautifully clean, continuous appearance.
Depending on its thickness and construction, a solid timber floor may also be sanded and refinished several times during its life. A properly installed floor can remain part of a building for generations.
Why Is Solid Wood Flooring Making a Comeback?
Laminate and click flooring can be convenient, but they do not completely reproduce the appearance, feel, sound or longevity of a properly installed solid timber floor.
Homeowners, designers and architects are returning to natural materials that age well and add genuine character to a property.
The benefits of traditional solid wood flooring include:
- The authentic appearance of real timber
- Natural variations in grain, colour and texture
- A substantial and permanent feel underfoot
- Excellent long-term durability
- Concealed fixings across the main floor
- The potential to sand and refinish the surface
- A timeless appearance that suits old and modern homes
- A floor that can develop more character as it ages
It is an age-old installation method, but the finished result feels just as relevant in a contemporary extension as it does in a period Dublin home.
What Is a Manual PortaNailer?
A manual PortaNailer is a specialist tool designed to install compatible tongue and groove solid wood and hardwood flooring.
The tool sits over the tongue edge of the floorboard. When the nailer’s driving cap is struck with the flooring mallet, it drives a purpose-made T-shaped nail through the tongue at an angle and into the timber subfloor.
The groove of the next board then fits over the nailed tongue, completely hiding the fixing.
This is why a PortaNailer is also commonly called a:
- Secret nailer
- Manual flooring nailer
- Hardwood flooring nailer
- Tongue and groove flooring nailer
- Blind flooring nailer
- Floorboard nailer
The tool requires no electricity, battery or air compressor. It is operated manually using a specialist flooring mallet.
Why Is It Called a Secret Nailer?
A PortaNailer is often called a secret nailer because you never see the nails across the main finished floor.
Each nail is driven diagonally through the tongue of a floorboard. When the next board is installed, its groove fits over the tongue and hides the nail.
The first and final rows may require face-nailing or careful hand-nailing because there is not enough room beside the walls to position the manual nailer. These fixings can normally be positioned where they will be covered by skirting or suitable flooring trim.
What Are T-Shaped Flooring Nails?
A manual PortaNailer uses purpose-made T-shaped flooring nails rather than ordinary round nails.
The shaped head and shank create a strong mechanical connection between the solid wood board and the timber subfloor. Driving the nail through the tongue at an angle helps secure the board while leaving its visible surface free from nail heads.
Do not assume that nails from a different type of flooring nailer will fit. T-shaped PortaNails and L-shaped flooring cleats are not automatically interchangeable.
A‑Z Hire supplies compatible T-shaped flooring nails for use with its manual PortaNailers. Check the thickness and installation requirements of your flooring before choosing a nail length.
How Do I Install Tongue and Groove Floors?
The traditional process involves secretly nailing each board through its tongue and into an approved timber subfloor.
In simple terms:
- Acclimatise the solid wood flooring.
- Check the moisture level of the flooring and subfloor.
- Prepare a dry, flat and secure timber base.
- Mark a perfectly straight starting line.
- Leave the specified expansion gap around the room.
- Secure the first rows by hand or face-nailing.
- Use the PortaNailer to drive T-shaped nails through each tongue.
- Fit the next board over the concealed fixings.
- Continue across the room while staggering the joints.
- Hand-nail or face-nail the final rows.
Always follow the flooring manufacturer’s instructions. Requirements for acclimatisation, moisture, expansion gaps, subfloor construction, board width and fixing intervals can vary between flooring products.
How to Install Solid Wood Flooring with a Manual PortaNailer
1. Acclimatise the Solid Wood Flooring
Solid timber naturally expands and contracts as temperature and humidity change.
The floorboards should be allowed to acclimatise inside the property for the period specified by the flooring manufacturer. The building should be enclosed, dry and maintained at normal living conditions before installation begins.
Do not assume that every type of flooring requires the same acclimatisation period. Follow the instructions supplied with your particular product.
2. Check the Moisture Conditions
Check the moisture content of both the flooring and the subfloor before installation.
Installing solid timber over a damp subfloor can lead to:
- Cupping
- Swelling
- Lifting
- Excessive movement
- Large gaps between boards
- Long-term damage to the timber
Where the floor is close to concrete, confirm the correct moisture barrier and subfloor construction before beginning.
3. Prepare the Timber Subfloor
The subfloor should be:
- Dry
- Flat
- Structurally sound
- Clean and free from debris
- Securely fixed
- Free from protruding nails or screws
- Suitable for accepting flooring nails
Loose boards or panels should be secured before the new floor is installed. Significant high or low areas must also be corrected because a flooring nailer cannot compensate for an uneven subfloor.
A manual PortaNailer is designed to drive nails into a suitable timber base. It must not be used to drive nails directly into concrete.
4. Plan the Direction of the Floorboards
Decide which direction the boards will run before opening the installation area.
The direction may be influenced by:
- The position of the supporting joists
- The construction of the subfloor
- The longest dimension of the room
- The direction of natural light
- Doorways and adjoining rooms
- The desired visual effect
Do not assume that the starting wall is perfectly straight. Measure the room and mark a straight reference line using a chalk line or laser.
Mix boards from several packs as you work. This distributes the natural colour and grain variations throughout the finished floor.
5. Leave an Expansion Gap
Solid wood needs room to move naturally as environmental conditions change.
Leave the expansion gap specified by the flooring manufacturer around:
- Walls
- Columns
- Pipes
- Door frames
- Hearths
- Fixed cabinets
- Other permanent obstructions
The expansion space is normally hidden later by skirting, beading or suitable flooring trim.
Do not reduce the specified gap simply to make the floor look tighter during installation. Insufficient expansion space can cause the floor to lift or buckle.
6. Install the First Rows
A manual PortaNailer with its standard angled shoe cannot normally be used immediately beside a wall.
The first rows may therefore need to be:
- Face-nailed
- Blind-nailed carefully by hand
- Fixed using an appropriate face-nailing accessory
The original Model 402 PortaNailer guidance recommends face-nailing the first two strips. However, the flooring manufacturer’s installation instructions should always take priority.
Position the opening rows particularly carefully. If they are not straight, the error will continue and become more noticeable as you move across the room.
Place any visible fixings where they can later be concealed by the skirting whenever possible. Exposed nail heads should be carefully countersunk and filled with a matching timber filler.
7. Position the PortaNailer
Once there is enough clearance to use the tool:
- Place the PortaNailer flat on the installed flooring.
- Hook its angled shoe over the tongue edge.
- Hold the tool firmly against the board.
- Make sure its base remains flat on the floor.
- Check that the nail will enter the correct part of the tongue.
It is sensible to test the nailer on a flooring offcut before beginning the main installation. This confirms the nail position and helps identify whether a different shoe, adjustment or nail length is required.
8. Seat the Floorboard
Use the non-marking rubber face of the flooring mallet, a tapping block or an approved flooring offcut to bring the boards tightly together.
Never hit the finished surface or exposed edge of the board with the metal face of the mallet. This could dent the timber, damage a prefinished surface or crush the tongue and groove.
Make sure the joint is fully closed before nailing the board.
9. Drive the T-Shaped Nail
Strike the PortaNailer’s driving cap with the metal face of the supplied mallet.
Use firm, controlled blows. Do not attempt to overpower the nailer with one unnecessarily hard strike. Continue striking until the nail is correctly seated and the nailer’s ram returns.
A properly seated nail should not obstruct the groove of the next floorboard.
The Model 402 instructions recommend positioning nails approximately every 8–10 inches, or about 200–250mm, with at least two nails in each board. However, the flooring manufacturer may specify a different fixing interval, particularly near board ends or when wider planks are being installed.
10. Fit the Next Board
Fit the groove of the next floorboard over the nailed tongue.
Bring the joint tightly together and check that:
- There is no visible gap.
- The board remains level.
- The tongue has not been damaged.
- The previous nail is completely concealed.
- The end joint is properly seated.
Stagger the board-end joints according to the flooring manufacturer’s instructions. Avoid forming repeated straight lines or an obvious stair-step pattern.
11. Continue Across the Room
Repeat the seating and secret-nailing process across the main floor.
Check your work regularly to ensure:
- The rows remain straight.
- All joints are tightly closed.
- The nails are fully seated.
- The board ends are staggered correctly.
- The expansion gap is maintained.
- The floor surface is protected from tools and debris.
- No damaged or unsuitable board has been installed.
It is easier to correct a small alignment issue early than after several additional rows have been nailed down.
12. Install the Final Rows
As the installation approaches the opposite wall, there will no longer be enough clearance to position the PortaNailer.
The final boards will normally need to be:
- Blind-nailed by hand
- Face-nailed
- Installed using an appropriate accessory
The Model 402 instructions indicate that the final six strips should not be installed with the standard angled shoe.
Position visible fixings as close to the wall as permitted so the skirting or trim can hide them. Countersink and fill any nail heads that will remain visible.
Can I Install Tongue and Groove Flooring Myself?
A capable and experienced DIY customer can install tongue and groove solid wood flooring, but careful preparation is essential.
You must be confident that:
- The timber has been properly acclimatised.
- The subfloor is suitable and sufficiently dry.
- The room has been measured accurately.
- The starting rows are perfectly straight.
- The correct expansion gap is maintained.
- The right nails and nail length are being used.
- The nailer is compatible with the flooring thickness.
If you are uncertain about damp conditions, underfloor heating, a concrete slab or the construction of the subfloor, consult the flooring supplier or a professional installer before proceeding.
Can a PortaNailer Be Used Over Concrete?
A manual PortaNailer must not be used to drive flooring nails directly into concrete.
In some cases, solid wood flooring can be secret-nailed over a concrete slab after an approved moisture-control system and a sufficiently thick timber subfloor have been installed.
The flooring nail must not pass through the timber base and strike the concrete. Doing so could damage the nail, the floor or the nailer’s internal driving blade.
The PortaNailer Model 402 documentation describes accessory arrangements for certain installations over plywood-covered concrete. However, the complete floor construction, moisture protection, accessory shoe and nail length should be confirmed before work begins.
Can a PortaNailer Be Used with Underfloor Heating?
Do not assume that solid wood flooring can be nailed over every underfloor heating system.
The suitability of the timber, subfloor and fixing method must be confirmed by the flooring and heating-system manufacturers. Nails must not be driven where they could contact heating pipes, electrical cables or other concealed services.
Engineered flooring is often preferred for some heated floors because of its dimensional stability, but every product and floor construction is different.
What Equipment Do I Need to Install Tongue and Groove Flooring?
Depending on the flooring and room, you may need:
- Manual PortaNailer or secret nailer
- Compatible T-shaped flooring nails
- Flooring mallet
- Moisture meter
- Tape measure
- Pencil
- Chalk line or laser
- Expansion spacers
- Suitable flooring saw
- Drill and small drill bits
- Hammer and nail punch
- Matching timber filler
- Flooring tapping block
- Pry bar or flooring pull bar
- Knee protection
- Safety footwear
- Eye protection
- Hearing protection
A‑Z Hire can provide the specialist manual PortaNailer required for the main installation, helping you avoid purchasing an expensive flooring tool for a single project.
Why Use a Manual PortaNailer?
A manual PortaNailer remains an excellent choice for traditional solid wood flooring because it provides:
- Concealed fixings across the main floor
- Strong mechanical attachment
- Tight and consistent board joints
- Controlled fixing through the tongue
- No air compressor or hose
- No electricity or batteries
- A proven traditional installation method
- A professional finish
- A practical rental option for one-off projects
The sound of the mallet and manual nailer might belong to an older generation of craftsmanship, but the finished result is timeless.
Where Can I Get Equipment to Install Tongue and Groove Floors?
If you are looking for equipment to install tongue and groove flooring in Dublin, A‑Z Hire has manual PortaNailers available to rent from Walkinstown, Dublin 12.
These machines are also commonly called secret nailers because the nails are hidden inside the tongue and groove joint.
A‑Z Hire also supplies the compatible T-shaped flooring nails required for installation. You can collect the specialist flooring tool and purchase the required nails from the same location.
A manual PortaNailer requires no compressor, electricity or battery, making it a simple and proven solution for installing compatible solid wood and hardwood flooring over an approved timber subfloor.
PortaNailer and Secret Nailer Hire in Dublin
Installing one timber floor does not mean you need to buy a specialist flooring nailer.
A‑Z Hire offers:
- Manual PortaNailer hire in Dublin
- Secret flooring nailer rental
- Equipment for installing tongue and groove floors
- T-shaped flooring nails available to purchase
- Equipment for professional flooring contractors
- Tool rental for capable DIY customers
- Convenient collection in Walkinstown, Dublin 12
Before collecting the nailer, check the thickness, type and installation instructions of your chosen flooring. This will help determine whether the available machine and T-shaped nails are suitable.
Contact A‑Z Hire to reserve your PortaNailer before starting your flooring project.
Frequently Asked Questions
How do I install tongue and groove floors?
Prepare a suitable timber subfloor, establish a straight starting line and secure the first rows. A manual PortaNailer can then drive T-shaped flooring nails diagonally through the tongue of each board. The next board fits over the nailed tongue and hides the fixing.
What tool installs solid tongue and groove flooring?
A manual PortaNailer or secret nailer is traditionally used to install compatible solid timber tongue and groove flooring over a suitable timber subfloor.
Is a PortaNailer the same as a secret nailer?
Yes. PortaNailers are commonly called secret nailers because the nails are driven through the tongue and concealed by the next board.
Do I need an air compressor?
No. A manual PortaNailer is operated with a flooring mallet. It does not require an air compressor, electricity or batteries.
What nails does a manual PortaNailer use?
Manual PortaNailers use compatible T-shaped flooring nails. Do not assume that ordinary nails or L-shaped flooring cleats will fit the machine.
Where can I buy T-shaped flooring nails in Dublin?
Compatible T-shaped flooring nails are available from A‑Z Hire in Walkinstown, Dublin 12.
Where can I rent a secret nailer in Dublin?
Manual PortaNailers and secret flooring nailers are available to rent from A‑Z Hire in Dublin.
Can I use a PortaNailer directly on concrete?
No. The flooring nails must enter a suitable timber subfloor and must not strike concrete.
Can a DIY customer use a manual flooring nailer?
Yes, provided the customer understands the flooring manufacturer’s instructions and prepares the floor correctly. If there is uncertainty about moisture, the subfloor or concealed services, seek professional advice.
Is it “tongue and groove” or “tongue and groover” flooring?
The correct term is tongue and groove flooring. Some customers search for “tongue and groover floors,” “tongue and groover flooring equipment” or similar variations, but they are generally looking for the same traditional interlocking flooring system.
Hire a Manual PortaNailer from A‑Z Hire
Bring traditional flooring craftsmanship back into your home with a manual PortaNailer from A‑Z Hire.
Our secret flooring nailers are available to rent in Dublin, with compatible T-shaped flooring nails available to purchase. It is a simple, reliable and time-tested way to install compatible tongue and groove solid wood flooring without visible fixings across the main floor.
A‑Z Hire is a trusted destination for tool hire in Dublin and is also a STIHL Authorised Dealer and Service Centre.

